Are you someone who gets all excited and nostalgic when watching cartoons?
Well, you are not alone!
The talking and moving characters, dramatic backgrounds, funny properties, and quirky preliminaries music make cartoons super engaging. All this intrigues people worldwide, raise their levels of marvel irrespective of their ages, and keeps them engaged throughout the elapsing of the storyboard video.
But do you know the psychology overdue this?
Whenever we watch cartoons, it reminds us of our diaper and unearths peaceful memories that were subconscious deep inside our brains.
Here’s an example…
Didn’t this GIF make you finger delighted?
Now, do you realize why turned-on movies have a calming effect on us?!
Several brands like Apple, McDonalds, Nintendo, etc. understood this mentality and took wholesomeness of it through a concept tabbed Nostalgia Marketing, which refers to promotion using ideas from the past.
This ways of promotion helped them get raving responses wideness the world.
So if you moreover want to get on workbench with big names and yank sustentation through the magic of Nostalgia Marketing, storyboard videos are the weightier bet!
And if you have decided to make cartoon videos, Animaker is the right place for you! Creating a storyboard video with talking notation is a piece of confection using Animaker!
So with no remoter delay, let’s jump right into the concept of making storyboard videos.
If you are wondering how to create storyboard videos, there are two methods:
Now all that’s left is creating the storyboard videos! Let’s start by learning how too can create a storyboard video from scratch.
1. How to make storyboard videos from a template?
If you are not familiar with the concept of video making and would like to exert significantly less energy in the very megacosm process, then editing a template would be the weightier option for you.
Animaker has a massive hodgepodge of pre-made templates wideness variegated categories like Video Ads, Corporate, Explainer, etc.
Since templates are pre-made perfectly by our in-house diamond experts, making minor changes here and there would help you get a trademark new video that moreover looks supreme in mins..
If you are ready to edit such a template and would like to learn how by watching a video, trammels this out!
Or, if you want to edit a template side-by-side by pursuit textual steps, protract reading. Here are the steps to edit a template.
Step 2: Exploring the Dashboard
Step 3: Selecting the perfect template
Step 5: Adding/editing the Character
Step 6: Altering the Music Track
Step 7: Previewing and Downloading the Video
Step 1: Signup/Login:
If you have not registered with Animaker already, Sign up here. To log in with your account, use this link.
Step 2: Exploring the Dashboard
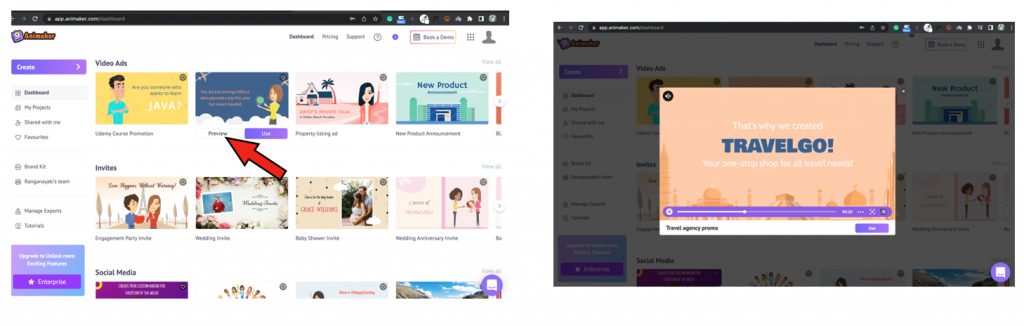
Once you are logged in, you will get redirected to the dashboard. Here, you will get to see a lot of pre-made templates for variegated categories. If you want to preview a template, hover over it and click on the “Preview” option.
Step 3: Selecting a template
Let’s start by creating a storyboard explainer video with notation for a business. Type “explainer” on the search tab to squint for an explainer video.
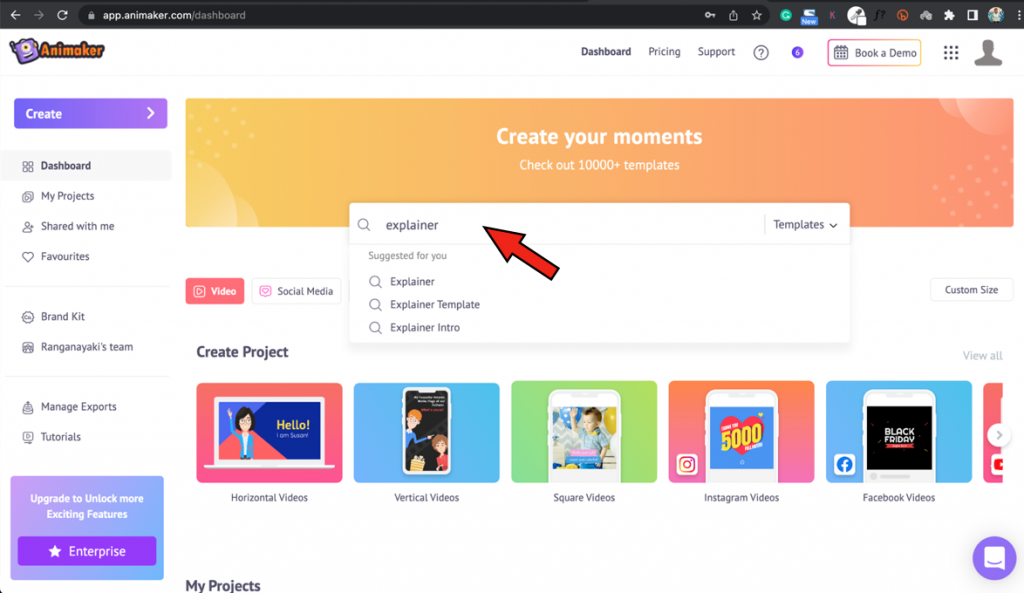
This lists several explainer videos. Let’s select the template – “Promote your product or service.”
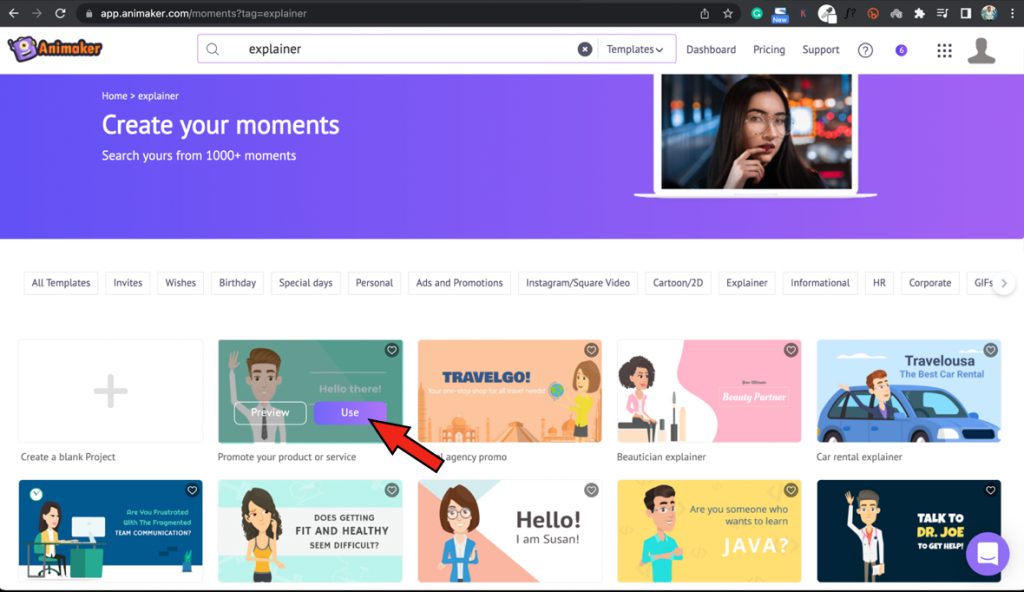
You will notice the template getting launched as a new project like this.
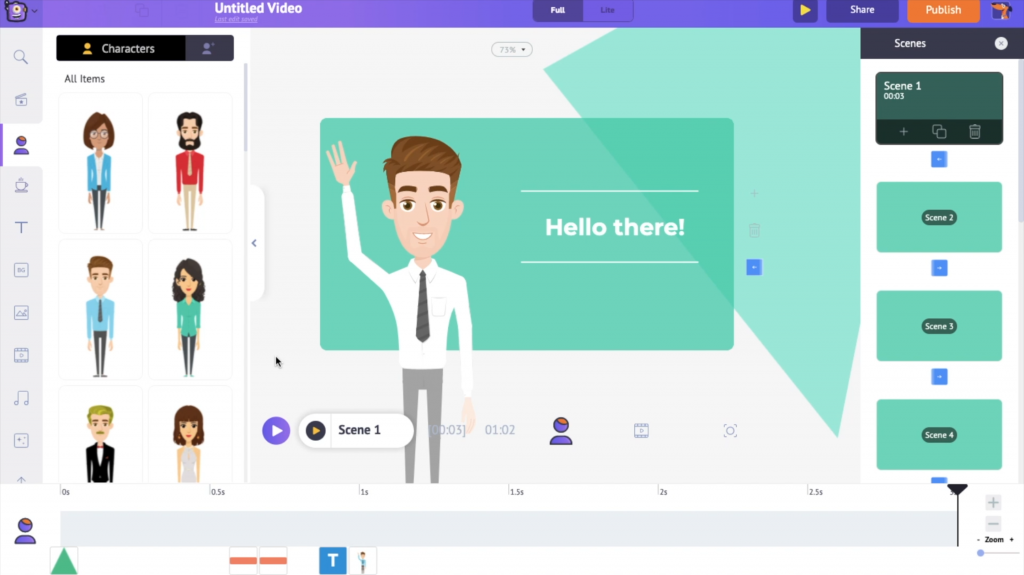
Do you see how the template has been made perfect with everything necessary, from the notation to the music?
So, your only task is to replace the elements and customize the video equal to your needs.
The overall time spent creating the video is reduced drastically, thanks to these templates!
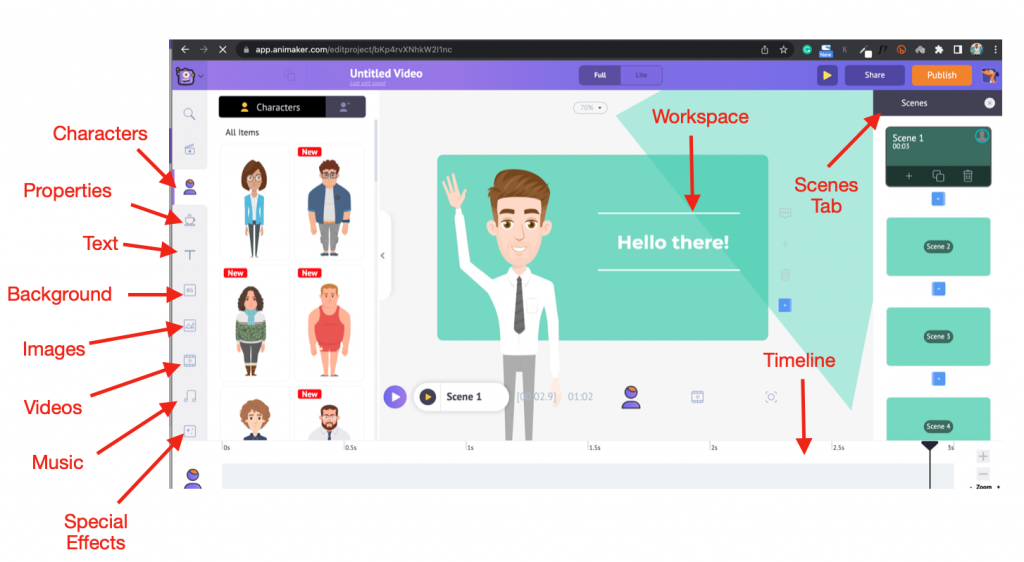
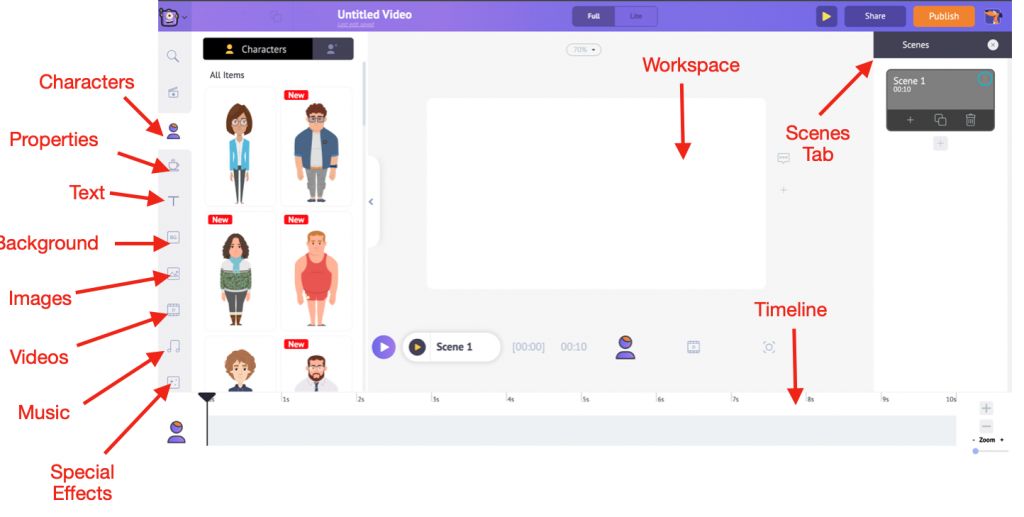
Before jumping into the customization part, let’s learn how the interface of Animaker looks.
Now, as the first step, let’s learn how to edit the weft in the template.
Step 4: Adding/Editing the Character
Since the template is pre-made, it has a weft in it already. So you can segregate to use it as it is or edit it as per your needs. You can moreover replace it by creating a unique weft from scratch.
Customizing the Weft in the template:
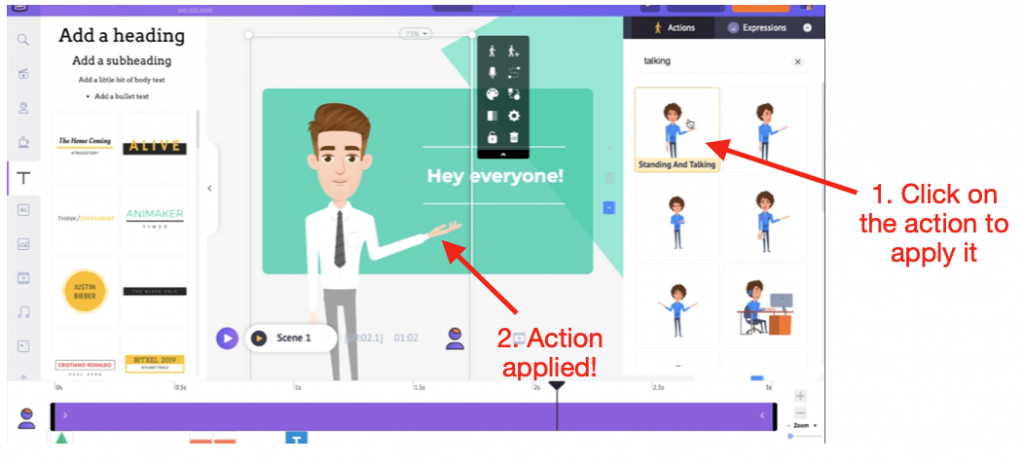
First, let’s learn how to edit the existing character. First, click on the character. Clicking on the weft opens the Actions Tab on the right side.
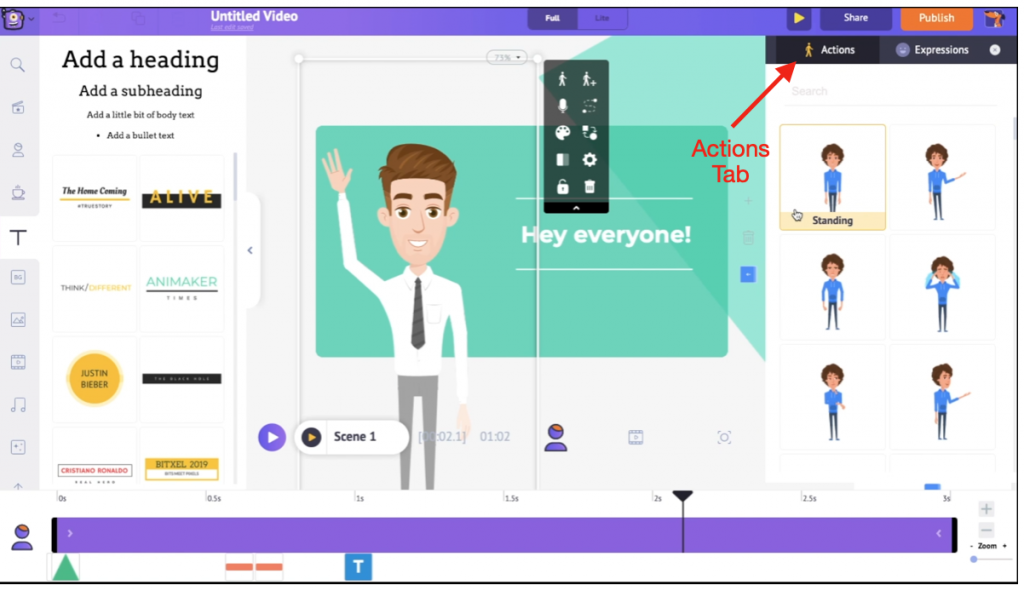
You can scan through the 500 deportment in the Deportment Tab if you want to transpiration the character’s action. Or, you can moreover search for the whoopee using the search tab.
Once you’ve found the action, you can wield it to the weft by simply clicking on it.
Easy, right?

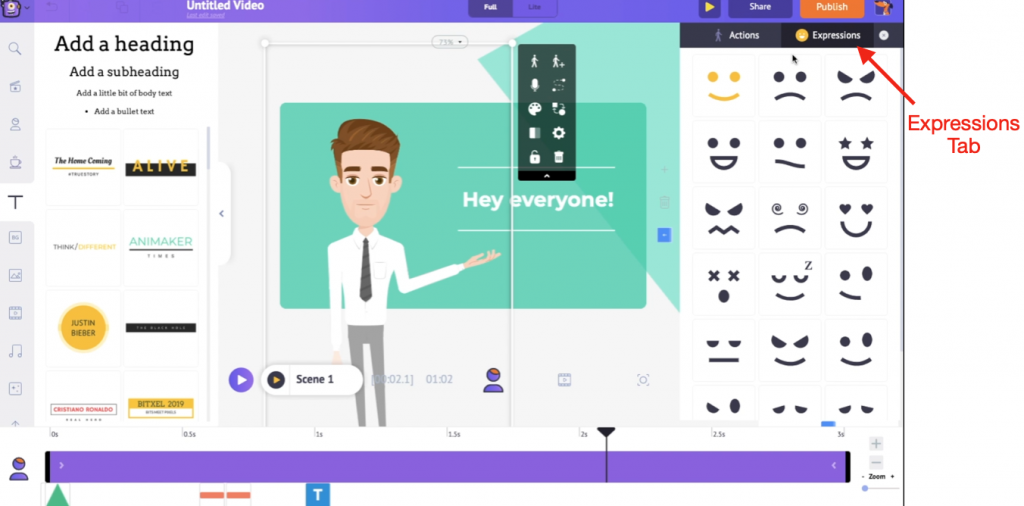
Similarly, if you want to transpiration the character’s expression, scan through the Expressions tab proximal to the Actions tab or search for the expression using the search tab. Once you find the proper expression from the 20 expressions available, you can click on the expression to wield it.

Apart from waffly the character’s whoopee and expression, you can moreover transpiration its skin tone, hair color, eye color, and verisimilitude of attire.
To do that, click on the character. This opens a small box tabbed the Item Menu with several options. Select the Change Verisimilitude option from the menu to edit the characters’ colors.
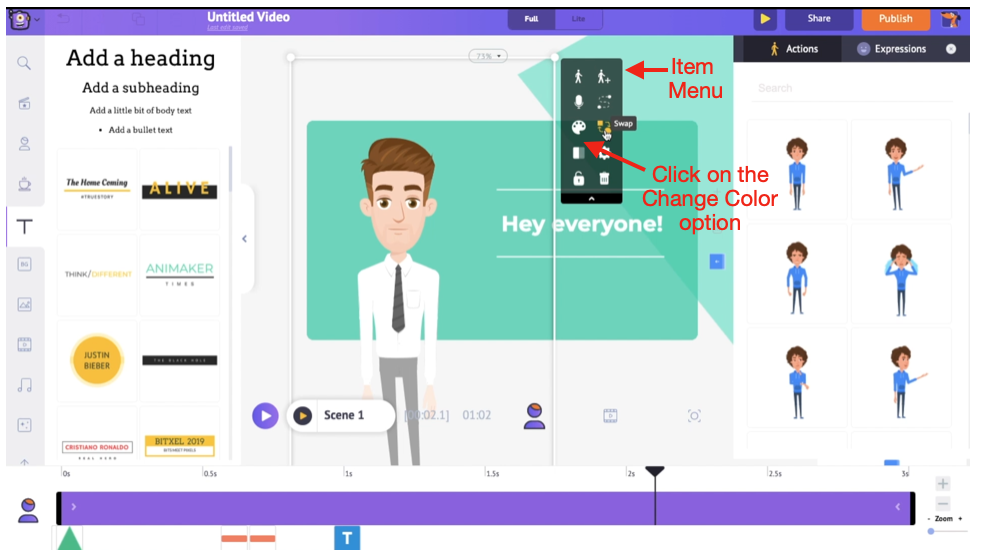
This opens the Color Tab. From here, you can transpiration the colors of the character.
Swapping the existing Weft with a new pre-made character:
Wanna replace the existing weft with a new character? Click on it. Then, from the Item Menu, select the Swap option.
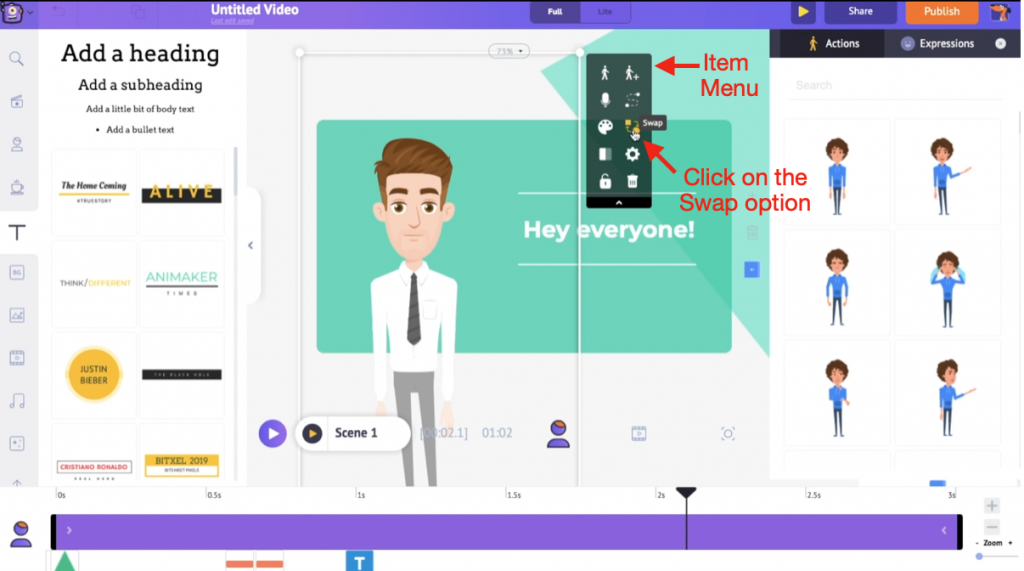
Selecting the swap option opens the Characters tab.
Here, you will see 40 Kid characters, 50 Plus-size characters, 50 regular-size characters, and 20 Animal characters, each with 500 actions. That’s a massive list, isn’t it?

Now, let’s finish swapping the character.
After selecting the swap option, click on the weft from the library with which you want to swap the current character.
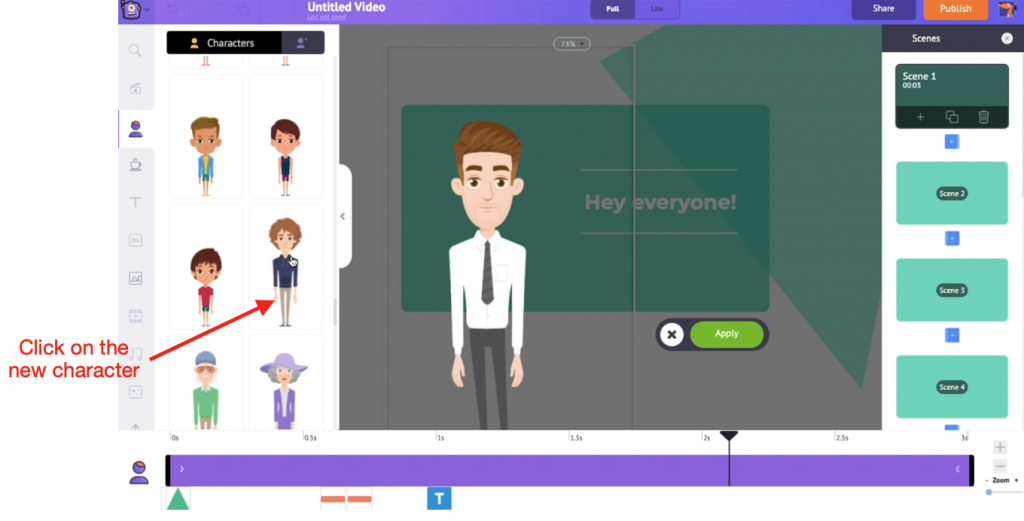
You will notice it getting widow to the workspace. Now, click on Apply.
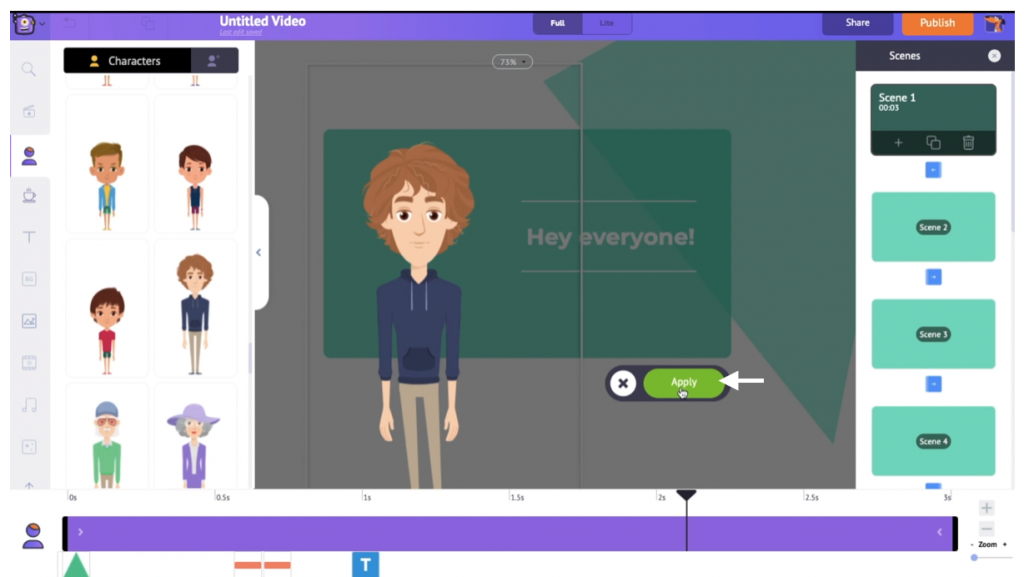
The new weft has been successfully widow to the workspace.
Awesome, right?
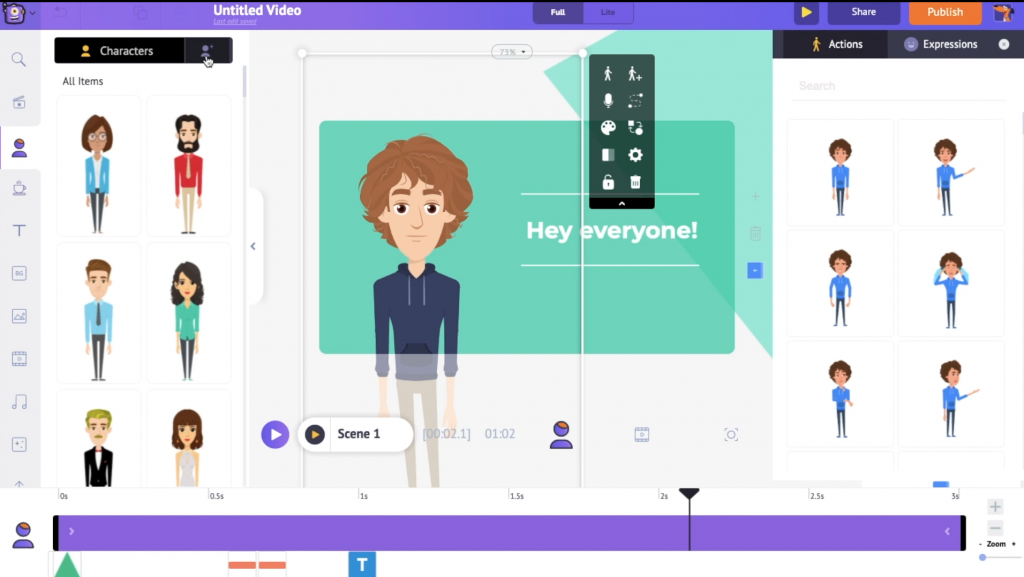
So far, we have learned how to edit the weft in the template and swap it with a pre-made weft from the weft library.
Apart from this, you can moreover create your own weft from scratch and use it in the video.
Creating your Own Character:
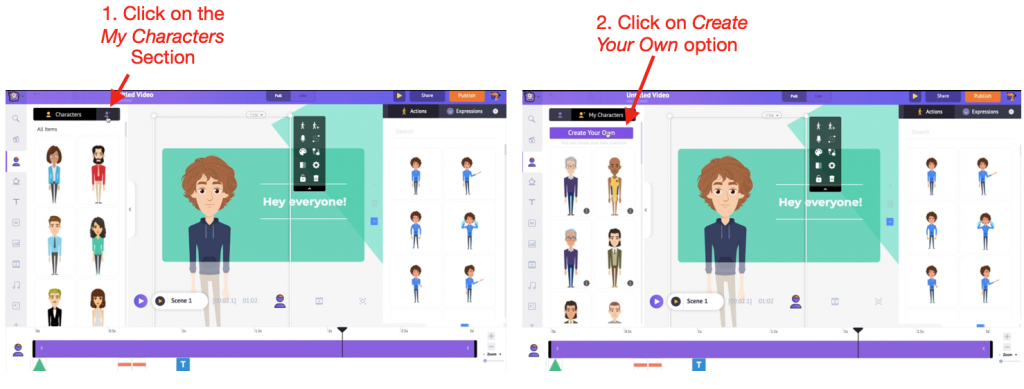
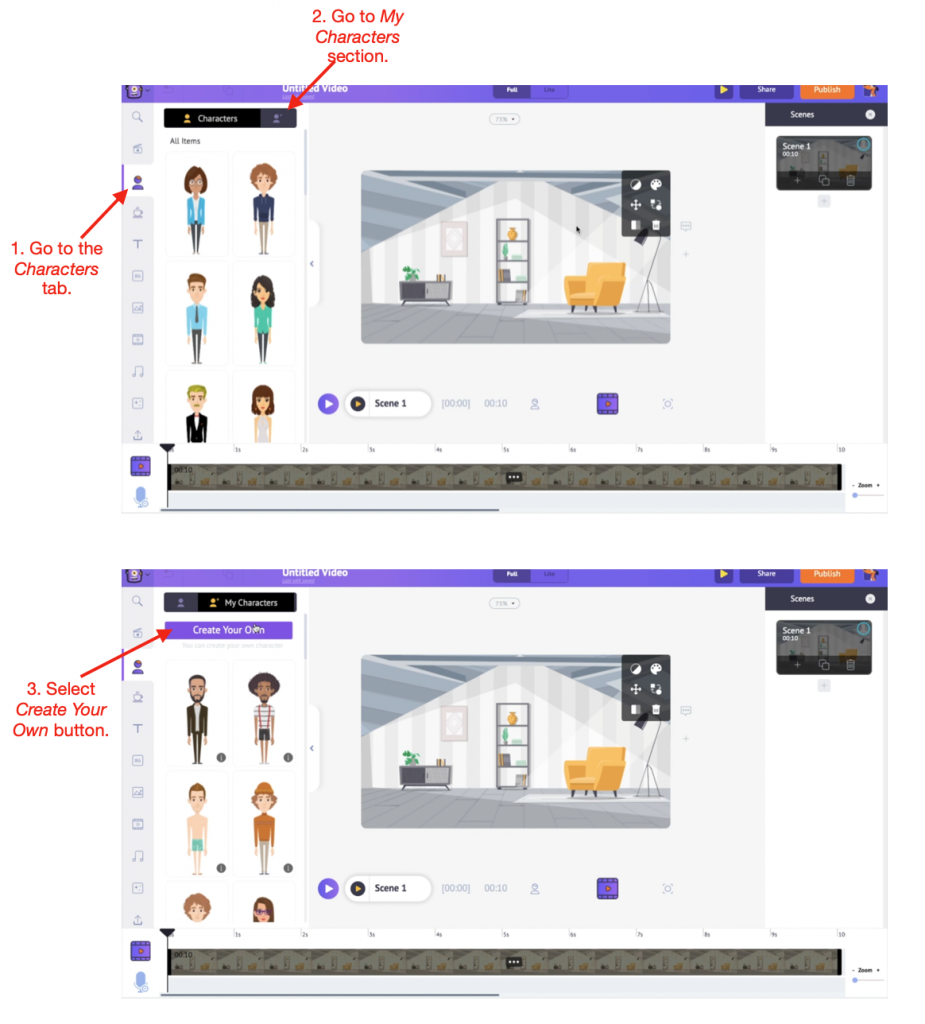
To create a new character, go to the My Notation section and click on Create your Own option.
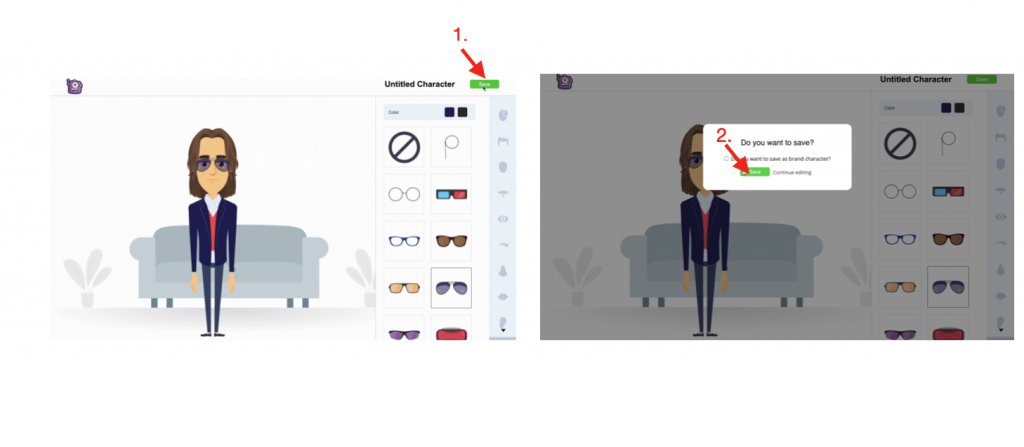
You will get redirected to the Character Builder. In the builder, select the gender and the character’s vital look, to uncork with.

After this, you can customize the character’s nature like skin tone, hair color, eye color, top and marrow wear, neckwear, accessories, etc. You can customize and create increasingly than 10K unique notation with variegated combinations!
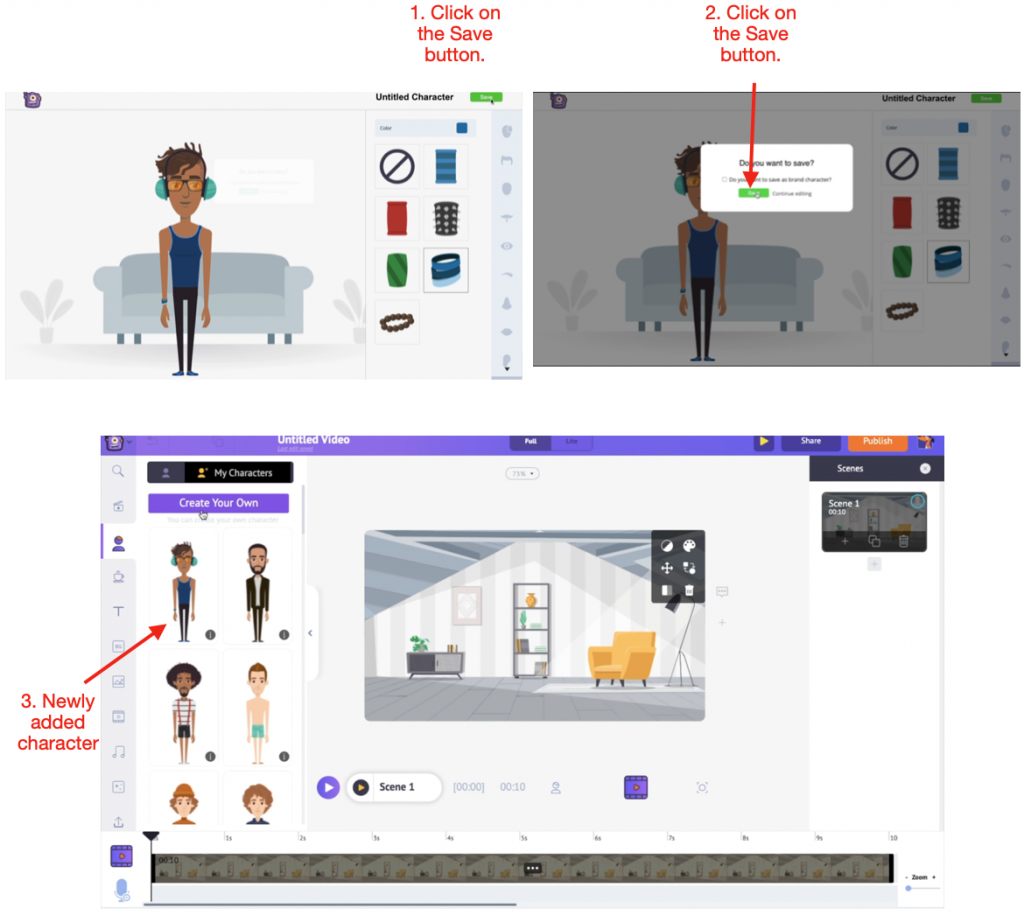
Once you are washed-up customizing the character, click on Save.
You will notice the new weft stuff widow to the My Notation section.
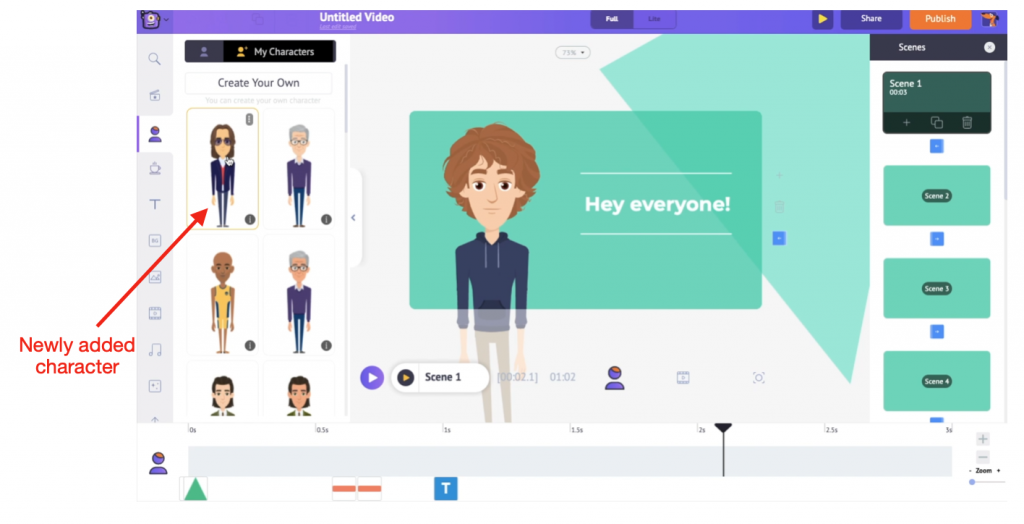
Now, you can either swap the existing weft with the newly created weft using the Swap option as we did earlier.
Or, you can remove the weft in the template by clicking on the delete option from the Item Menu. This removes the weft from the scene. Then, click on the newly created weft to add it to the scene.

Follow the same steps for editing the weft in all scenes.
Step 5: Editing Text
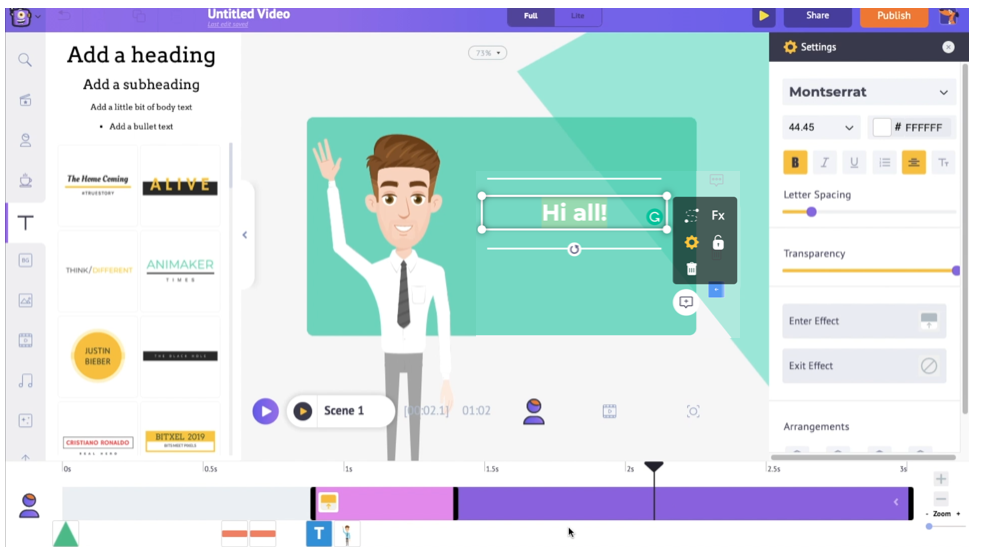
Let’s move on to edit the text in the scene. Click on the text and start typing to edit it.
After waffly the text, click on it to unshut the Text settings tab. In this tab, you can transpiration the text settings like font, size, color, transparency, alignment, etc.
Check out how the edited text looks!
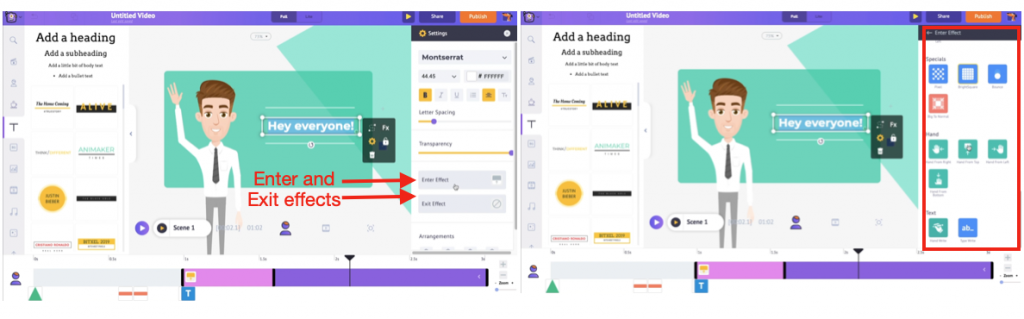
Once you add a new piece of text or click on the existing text, you will see the text is highlighted on the timeline. In addition, you will notice that the text has two sections, a pink and a purple one. The pink section denotes the elapsing of the text effects, and the purple zone represents the elapsing of the text itself.
Use the bars at the end to proffer the text’s elapsing and effects.

Go to the Settings Tab to transpiration the text’s entry and exit effects. You will see various effects that you can wield to your text. Click on any effect and transpiration how your text makes an entry/exit.
Follow the same steps for editing the text in all scenes.
Step 6: Altering the Music Track
After editing all the scenes by replacing the text, characters, and other assets, the only step left is to transpiration the music track. And subtracting an apt music track that suits the theme of the video is very important.
Since the Animaker library has 30K royalty-free tracks, finding a suitable music track is an effortless task!
To transpiration the music track, go to the audio and video timeline. Here, you will see the music track used in the template.
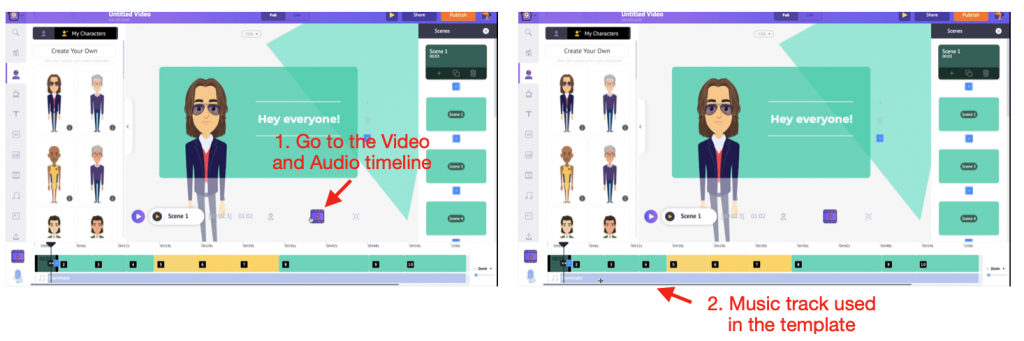
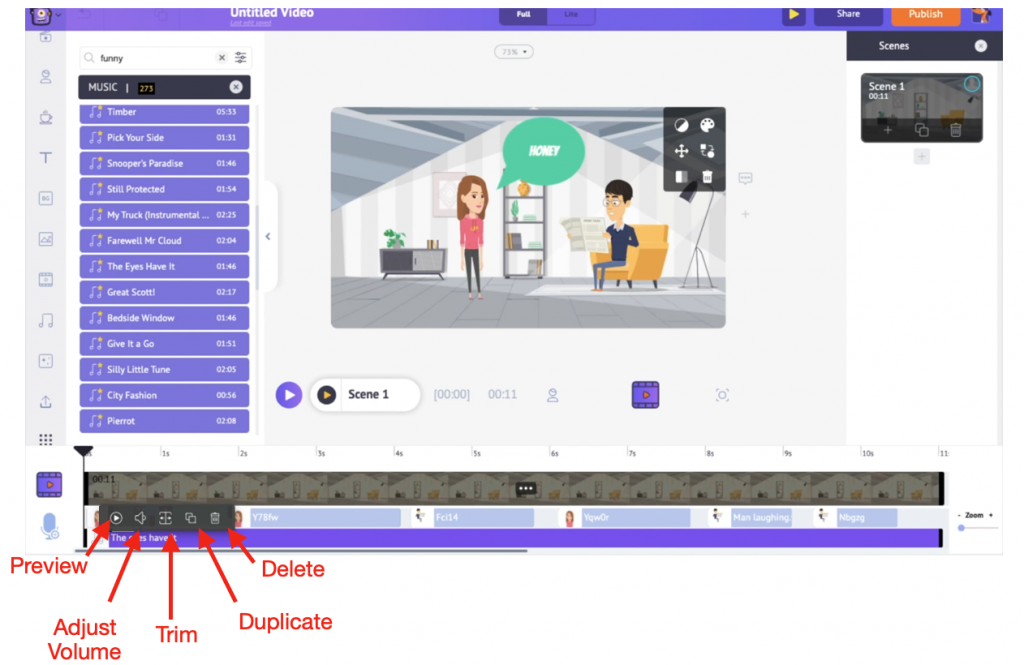
When you click on the music track, you will see options to preview, retread volume, trim, duplicate, and delete the track.
Let’s delete the existing track and add a new track instead!
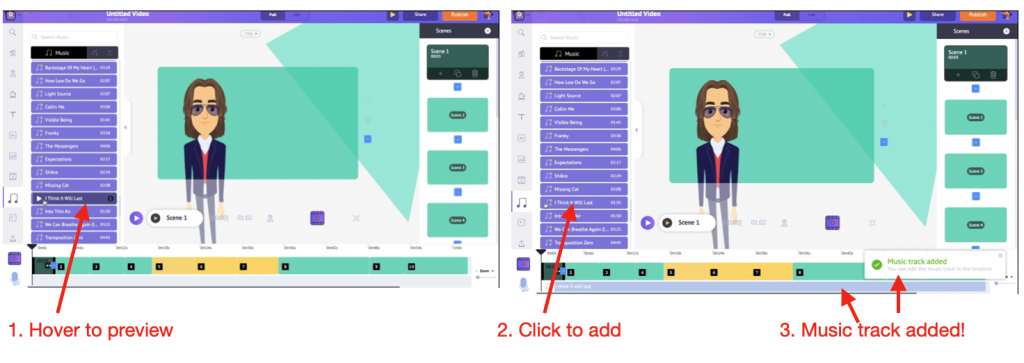
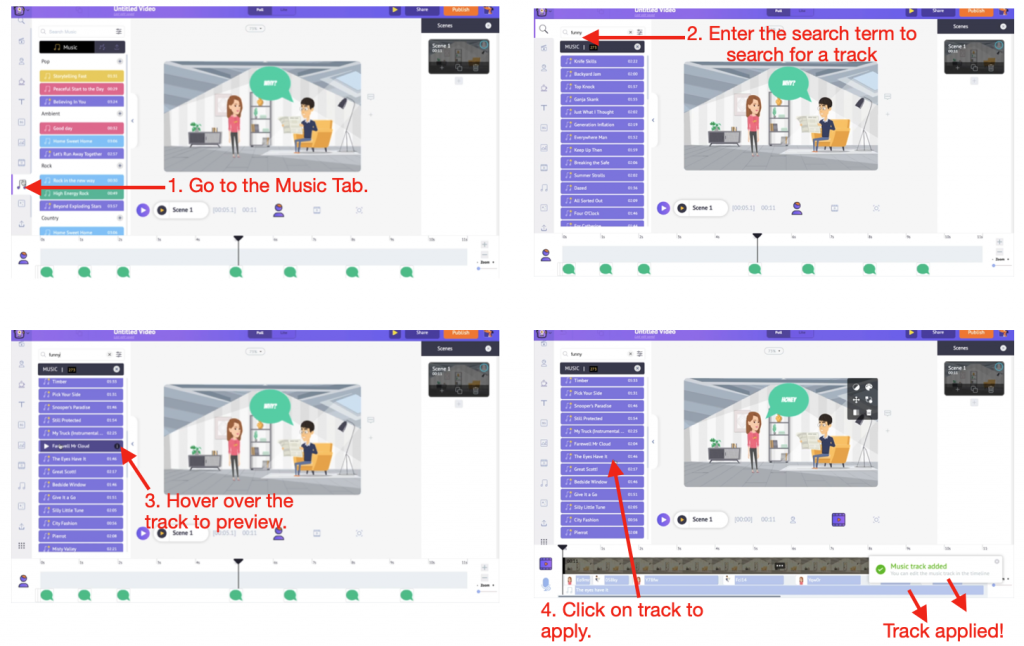
To add a music track, Go to Library -> Music.
The tracks are categorized based on themes. First, use the search tab to enter keywords and squint for tracks. Then, hover over a track to preview it and click on the track to add it.
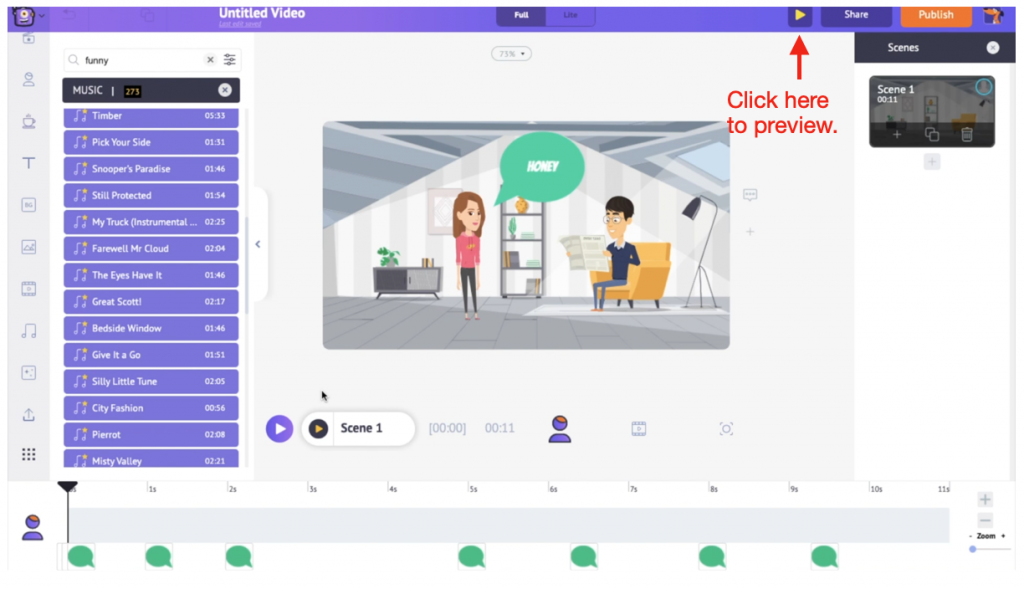
Step 7: Previewing and Downloading the Video
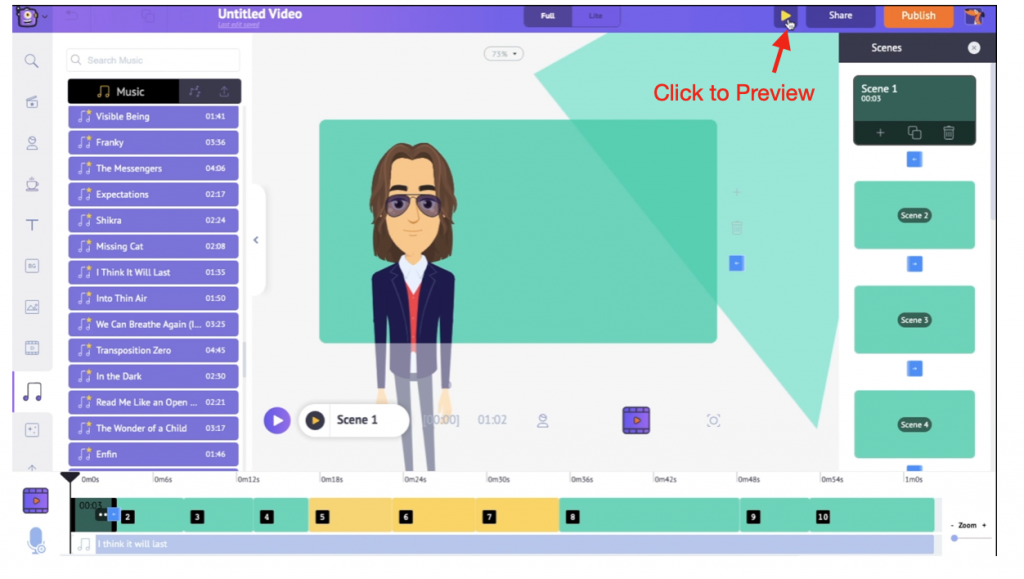
Once you are washed-up making changes in all the scenes, you would want to know how the video customized video looks. To know that, click the play sawed-off to preview the well-constructed video.
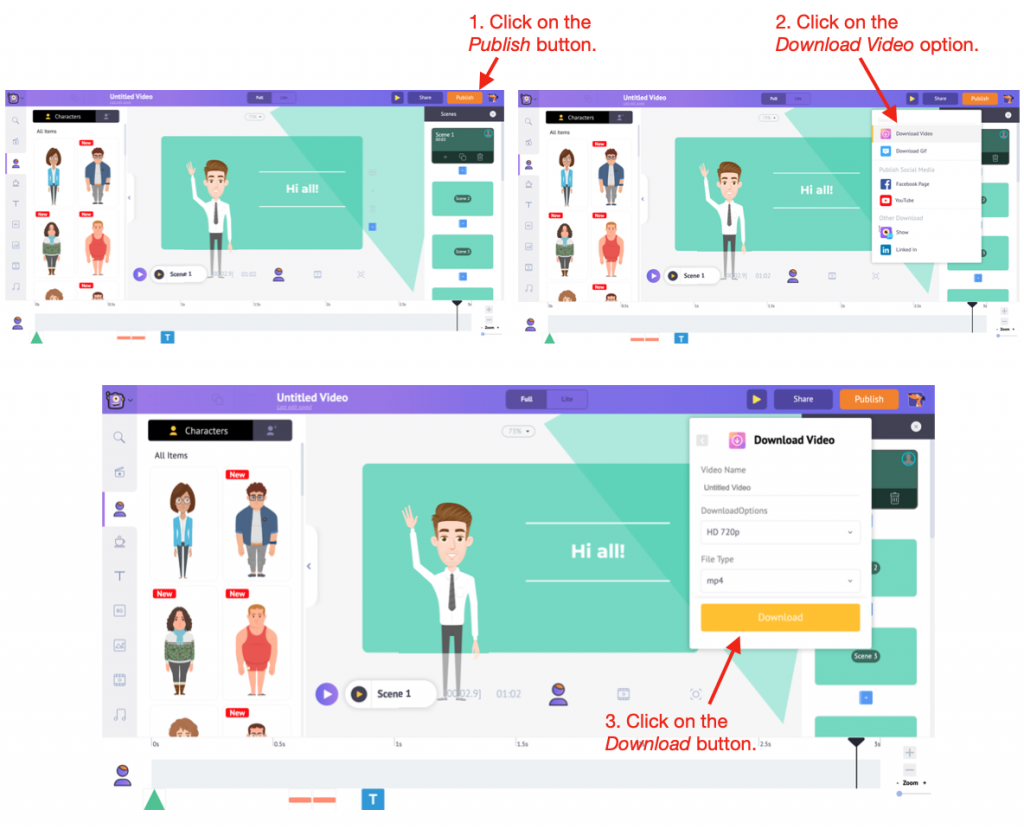
If you want to make changes anywhere, follow the previous steps to make alterations. Otherwise, you are all set now! The only step left is to download the video.
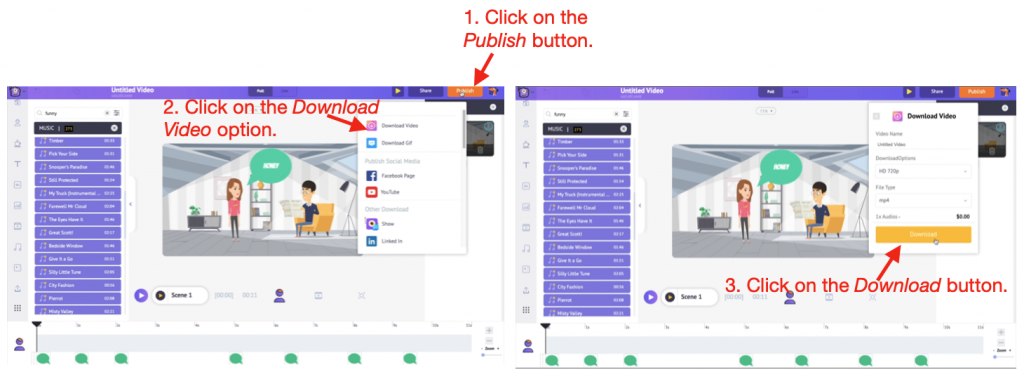
Click on Publish -> Download Video -> Download to publish your video. You can specify the video quality and File Type while downloading. You can plane download it as a 4K video!
This is the easiest way to make storyboard videos.

Now, let’s learn how to make a storyboard video from scratch!
2. How to make storyboard videos from scratch
For those in a hurry, we just learned how to create tomfool storyboard videos by editing a template.
But if you have a little uneaten time and like creating videos that tap into your creative skills, then you can create a storyboard video from scratch.
The specialty of Animaker is that you don’t have to be a genius to create a video like a genius! So, creating a video from zero is not going to be difficult!
As a bonus, we’ll moreover show you how to use talking notation in your storyboard video.
To know how to create a storyboard video from scratch, trammels out this video if you finger that learning from a video would be increasingly helpful.
Or, if you are well-appointed learning from a step-by-step textual guide, protract reading.
Now let’s swoop into the variegated steps needed to create videos from scratch.
Step 2: Opening a zippo project
Step 3: Subtracting the perfect background
Step 4: Subtracting new notation with voice-overs
Step 5: Subtracting text in speech bubbles
Step 6: Subtracting Music Tracks
Step 7: Previewing and Downloading the Video
Step 1: Signup/Login:
If you are new to Animaker, sign up here. Are you a member already? Login here.
Step 2: Opening a zippo project
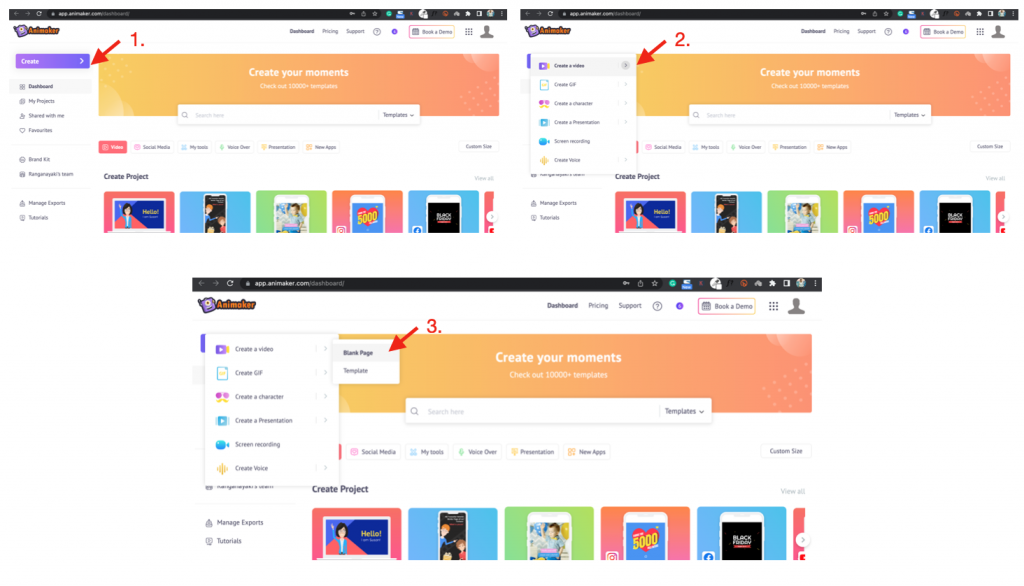
Now, you will get redirected to the dashboard. To create a video from scratch, you must unshut a zippo project. To do that, click Create -> Create a Video -> Zippo Page.
Now, you’ve launched a zippo project. Before creating a video, let’s learn how the interface of Animaker looks.
Step 3: Subtracting the perfect background
First, let’s start by setting the preliminaries for the video. Let it be a conversation between two people in their living room. So, we need to select a preliminaries that resembles a living room.
To add a preliminaries to the scene, select Library -> Background. Animaker has a massive hodgepodge of superstitious backgrounds.
Since we know the type of BG we are looking for, let’s enter the keyword “living room” in the search tab and search for it. Alternatively, we can moreover scroll through the unshortened list of BGs and segregate one that suits our needs.
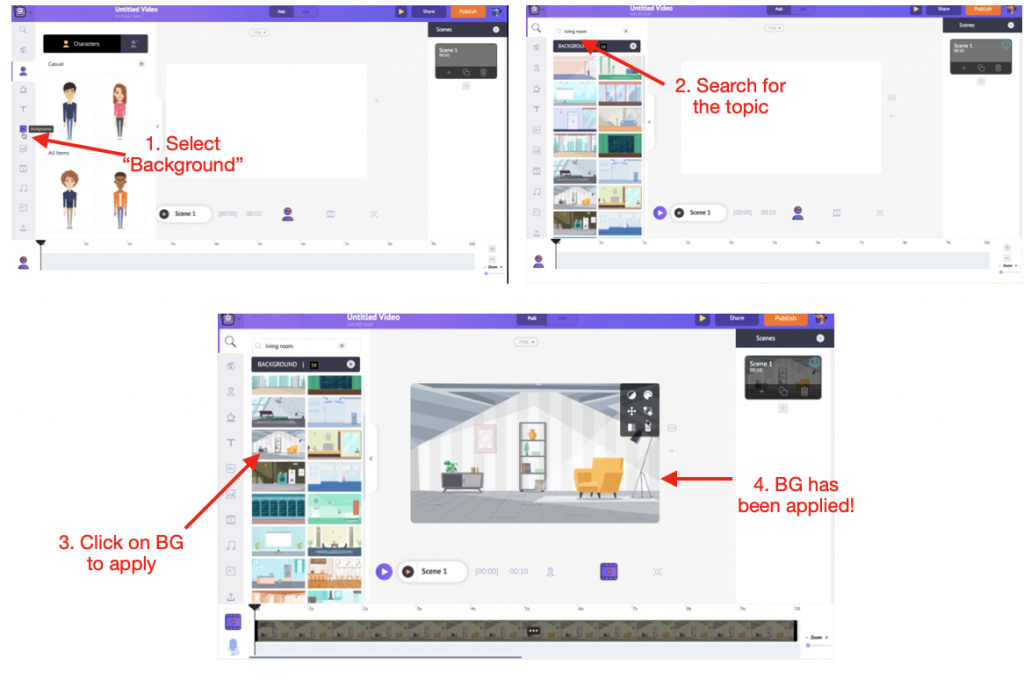
Now that the BG has been added, the next step is to bring in the stars of the video, the characters.
Step 4: Subtracting new notation with voice-overs
Animaker has a vast hodgepodge of notation with varieties like Adults, Kids, Plus-size, Animals, etc. You can segregate any by scrolling through the long list of characters.
You can add a pre-made weft or create a unique one by customizing the various skeletons. Go to Library -> Character to add a weft to the workspace.
First, let’s learn how to create a unique, customized character. Go to the My Notation section under the Characters Tab. Select the Create your Own button.
This opens the Character Builder. Start by selecting the weft skeleton and then the vital weft template.
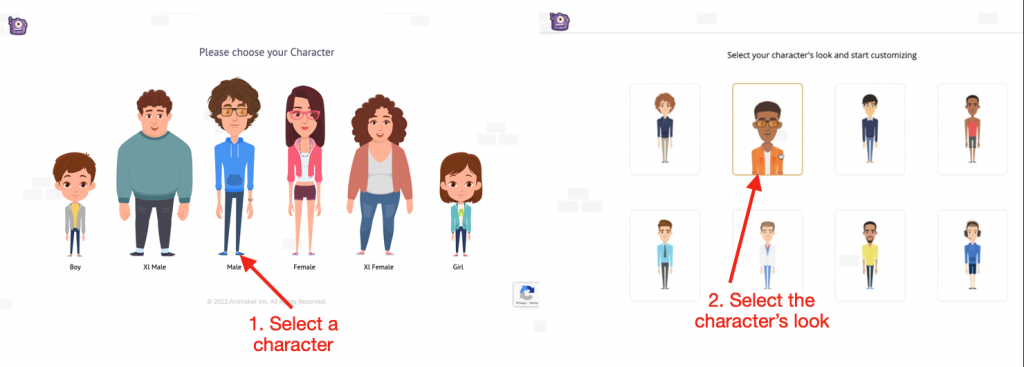
The weft builder has a lot of options to customize your character. For example, you can segregate variegated hairdos, eyebrow shapes and colors, accessories, shoes, masks, clothes, etc. By this, you can create increasingly than a billion notation and create lookalikes.
Once you are washed-up customizing the character, select the Save button. This adds the newly customized weft to the My Notation section.
So, that’s how you create a new custom character. That was easy, wasn’t it?
The other way to add notation to your video is to select from the long list of pre-made notation from the Animaker library. Let’s segregate two such pre-made notation for our storyboard video.
Let’s add the first character.
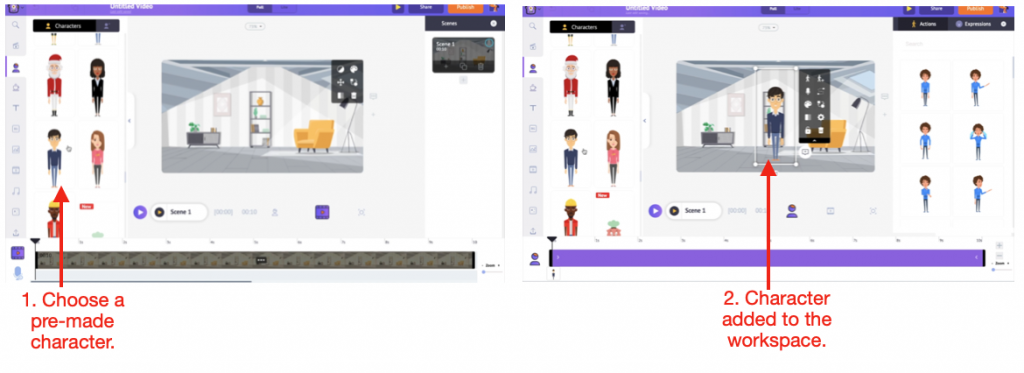
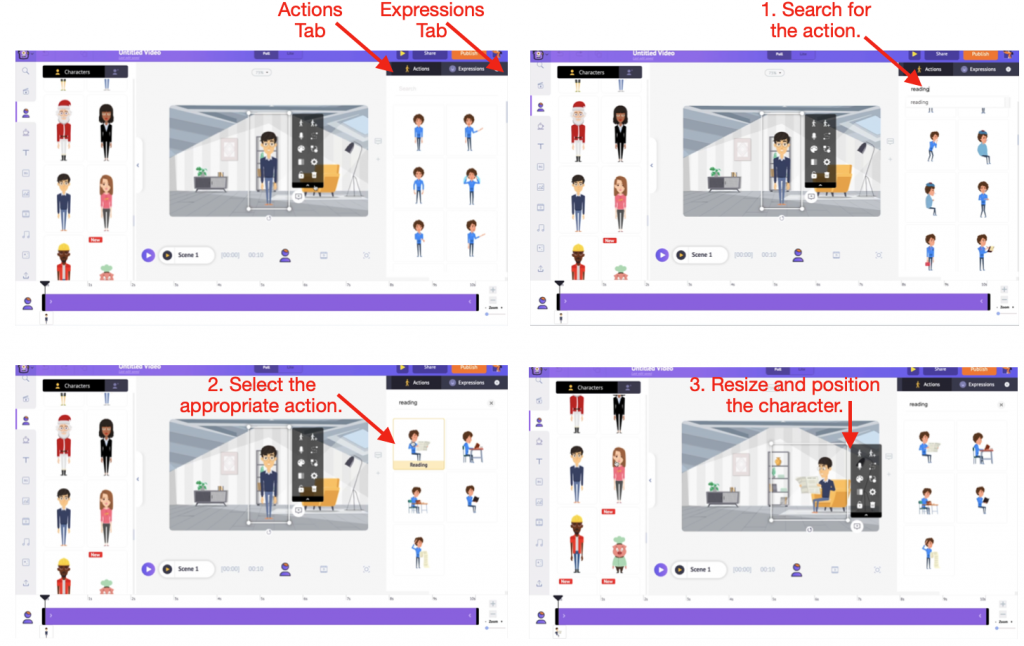
Once the weft is widow to the library, you will notice the Actions Tab unshut on the right. This tab has 1000 deportment that you can wield to the character. Proximal to the Actions Tab is the Expressions Tab, which has 20 expressions for the character.
Let’s make this weft sit in the preliminaries chair and read a newspaper. To do that, search for the term “reading” in the search bar of the Actions tab. This displays variegated reading actions. Let’s select the weightier whoopee and position the weft perfectly.
It’s time to add the second weft to the scene. First, let’s make this weft stand and talk. So, as we did for the first character, select the weft to unshut the Deportment Tab, search for the action, wield it to the character, and position it in the scene.
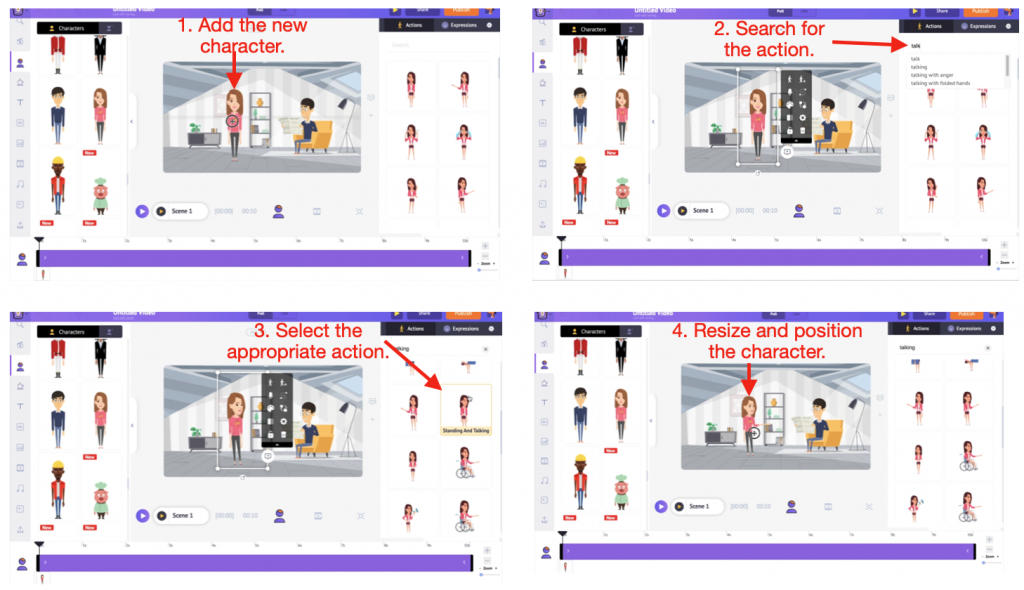
This is how you can add pre-made notation and moreover wield deportment to it! Easy, right?
Adding voiceovers:
Now, it’s time to add voiceovers to our characters. I have a conversation scripted for this purpose. So, let’s jump into the process of subtracting the scripted dialogues as voiceovers to the characters.
To add a voiceover, click on the character. This opens the Item Menu, which has a tuft of options. From the Item menu, select the voice-over option.
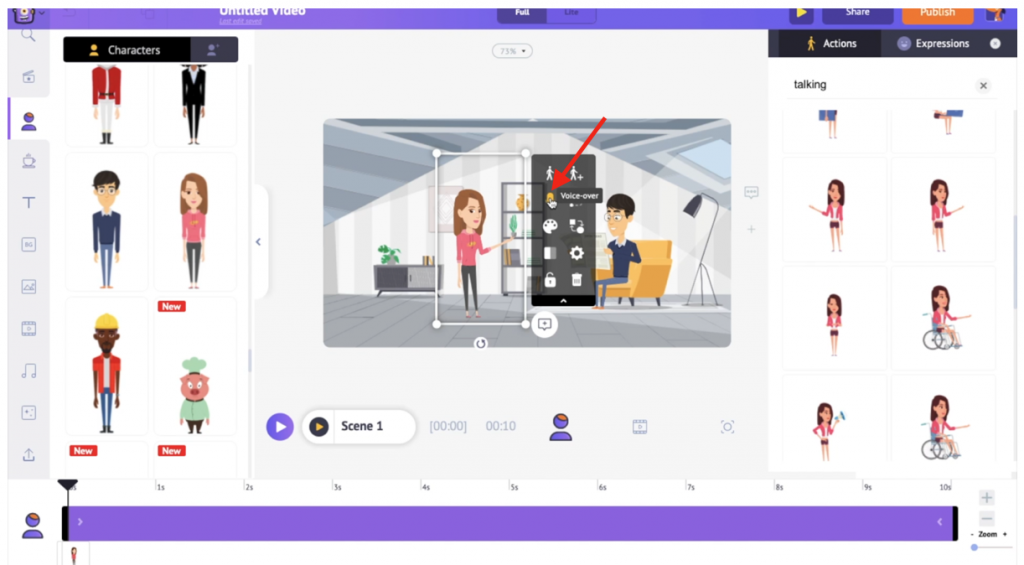
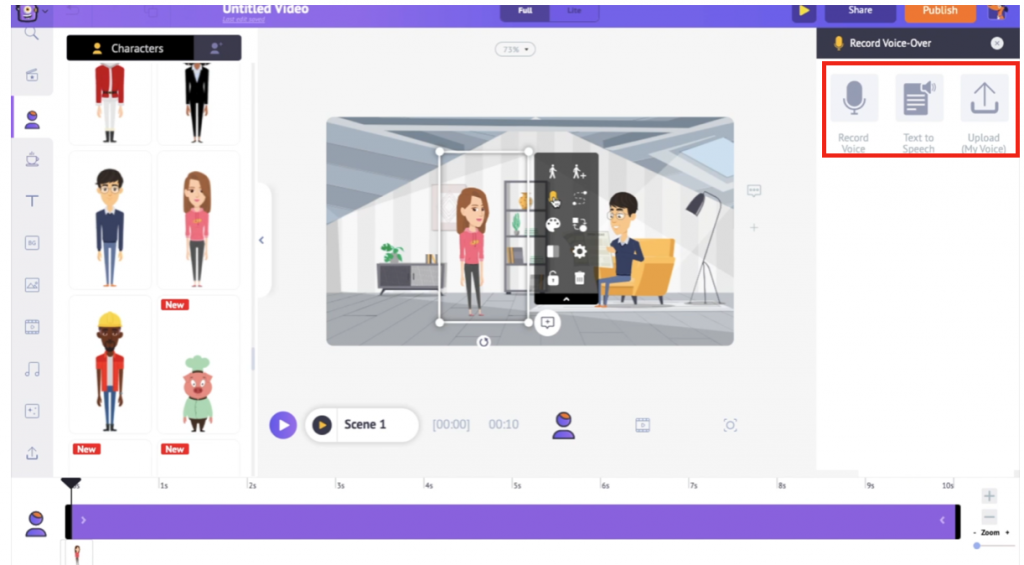
In Animaker, you can add voiceovers via three methods. You can record your voice, add text and convert it to a voiceover (Text to speech), or upload a pre-recorded voiceover and sync it with your character.
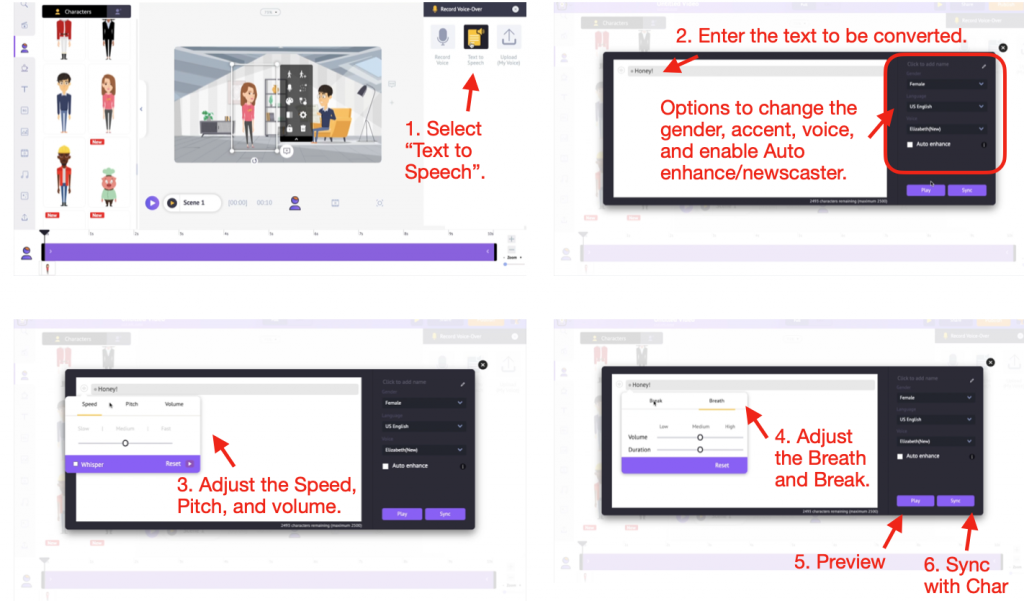
Let’s start by subtracting voiceovers through the second option, Text to speech. Upon selecting this option, the Text to speech window opens. You can type in the dialogue and select gender, language, and voice. Within language, there are variegated accents to segregate from, and within the voice, there are variegated tones to select.
To ensure that the voice doesn’t sound robotic, there are options to retread the volume, pitch, speed, breath, and break. In addition, there are moreover options tabbed Auto-enhance and Newscaster. These options can make your voice-over sound human-like in one single click!
Once you have explored and unromantic these options, use the play sawed-off to preview the voice. Then, if you are satisfied, select the Sync sawed-off to sync the voiceover to your character.
Once you have synced the voiceover with your character, you will notice that it has been widow to the timeline. You can retread its position in the timeline accordingly.
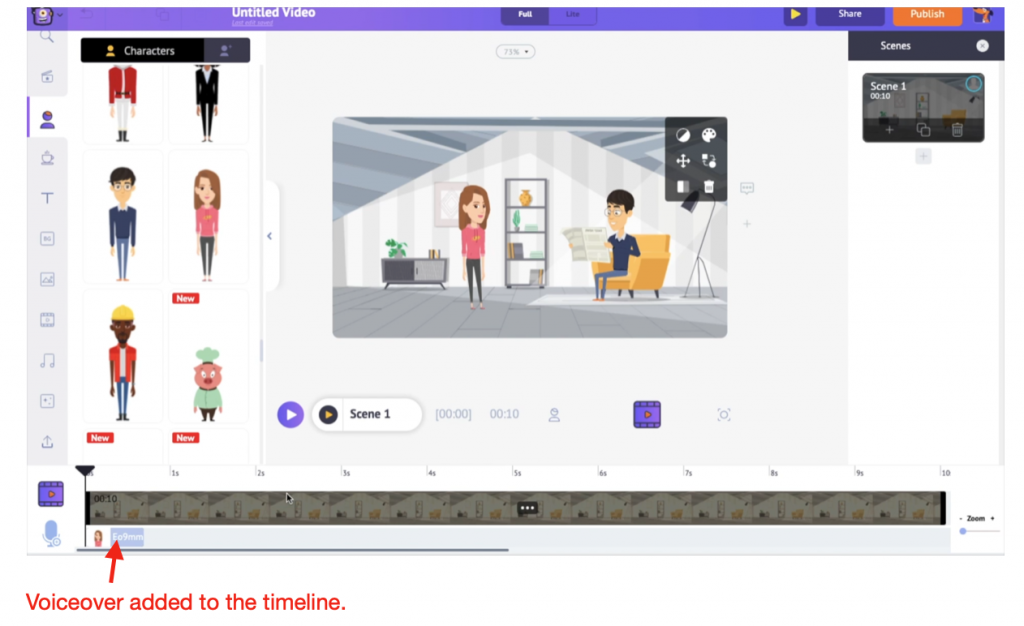
Similarly, you can add increasingly voiceovers to your notation and retread the timings to construct the conversation perfectly!
Step 5: Subtracting text in speech bubbles
Once you are washed-up subtracting the voiceovers, the next step is to add the text to the video. Instead of subtracting it as plain text, subtracting it in speech frothing can requite the video a comic-like effect!

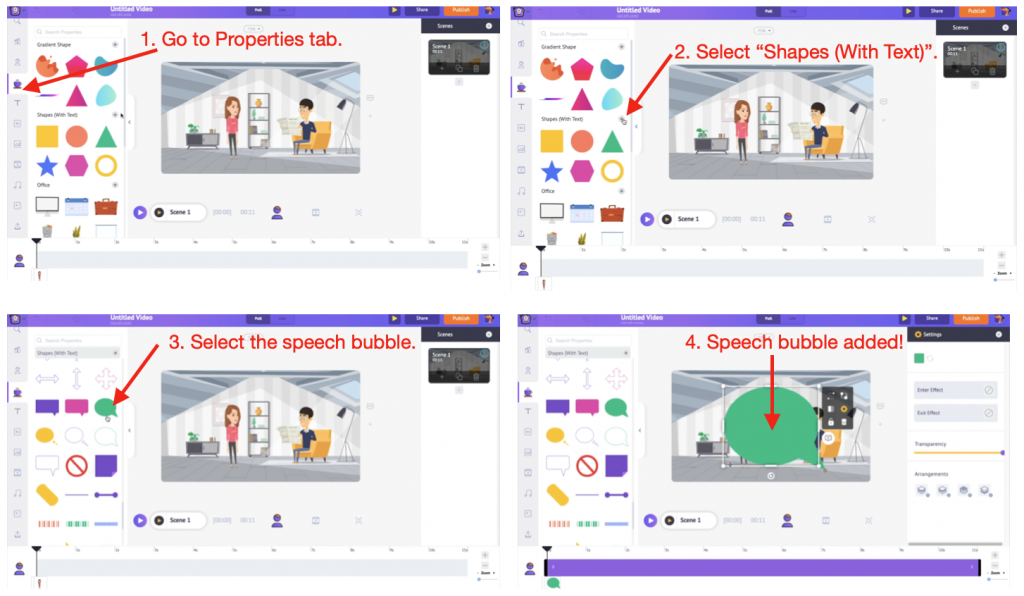
To add a speech bubble, go to Properties -> Shapes (With Text) and then select a speech bubble.
You can resize the rainbow and position it wherever you want. To flip the bubble, click on it and select the Flip option from the Item menu.
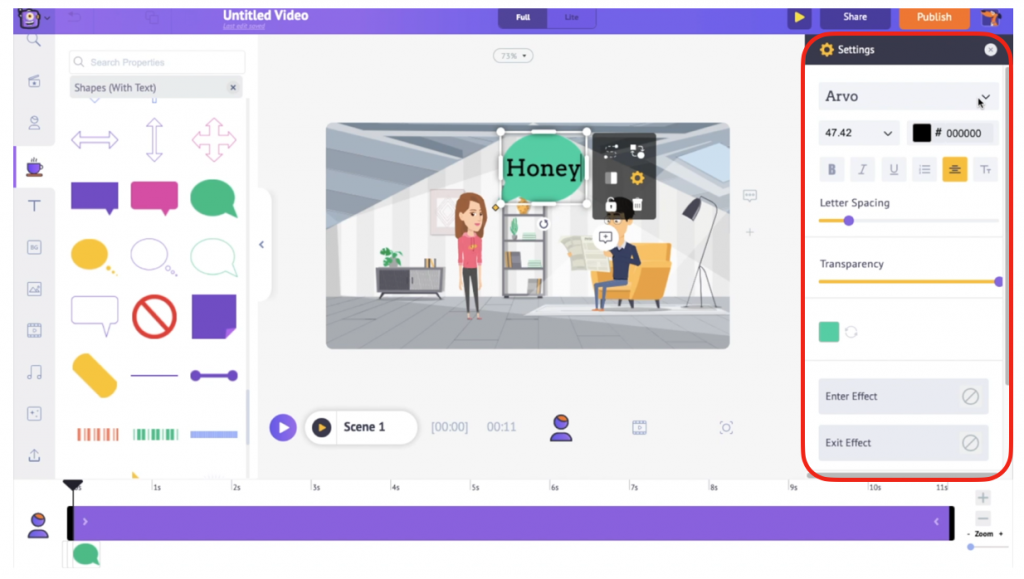
Double click on the rainbow and start typing to add text to it.
To customize the speech rainbow and the text, click on the bubble. This opens the settings window, from which you can transpiration the verisimilitude of the bubble, transpiration the text’s font, font size, and color, or add enter and exit effects to the bubble.
Now we must retread the speech bubble’s timing so that it disappears when the voiceover ends. To do that, click the bubble. You will notice it getting highlighted on the timeline. In the timeline, select the end bar and bring it to the elapsing where you want the rainbow to disappear.
Similarly, you can add the remaining speech frothing to the scene. Instead of subtracting them manually by going to the properties section, you can simply reprinting and paste the first bubble. After pasting the bubble, all you have to do is transpiration the text and retread the timings. As simple as that!
Step 6: Subtracting Music Tracks
We have come to the end of the very video-making process. For our storyboard video, we widow everything necessary from the notation to the speech bubbles, except for one thing. The comical preliminaries music, of course!
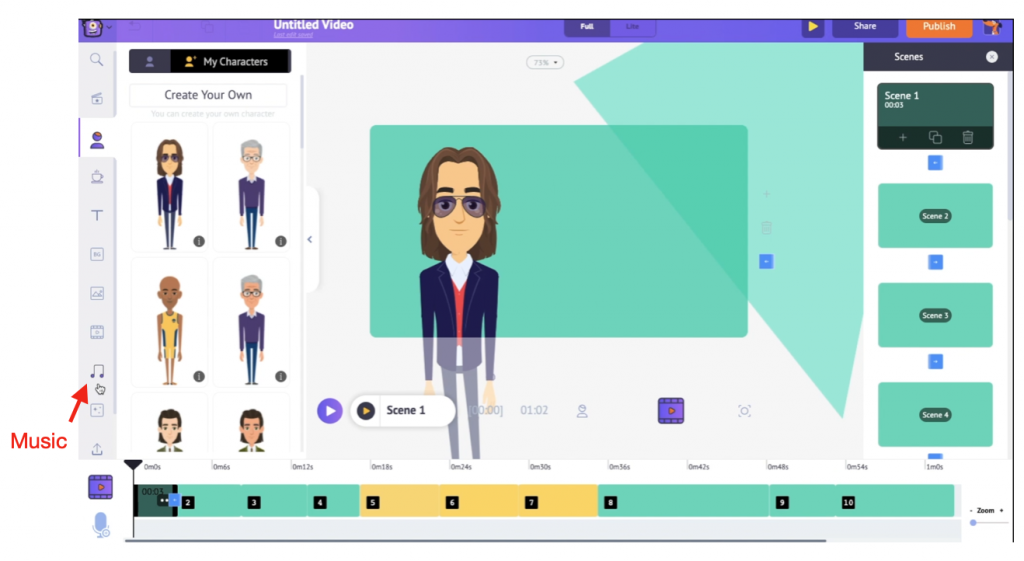
To add a music track to the video, go to Library -> Music. The library has 30K royalty-free music tracks for any and every mood.
Search for a music track by inward the keyword in the search tab. To preview it, hover over the track. Then, click on the track to add it to the video.
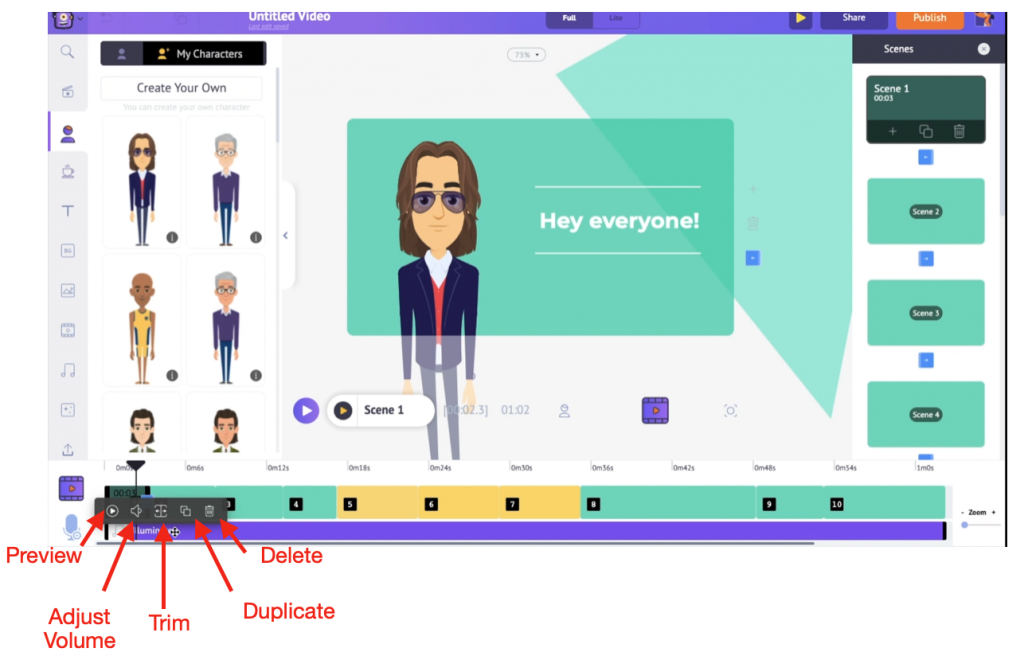
When you click on the track in the timeline, you will see five options appearing. Use them to preview, retread the volume, trim, duplicate, and delete the track.
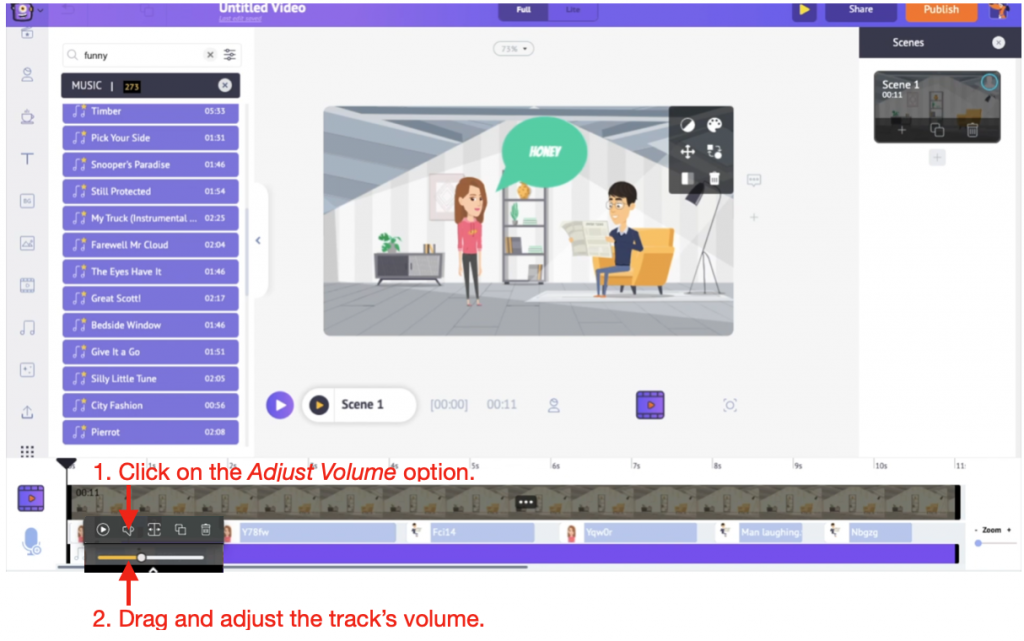
The most crucial speciality of a video with voiceovers is that the music track shouldn’t overpower the voiceovers added. To stave that, you can use the Adjust Volume option and reduce the volume of the music track.
That’s how you add a music track to your video!
Step 7: Previewing and Downloading the Video
Now, we are scrutinizingly done! All we have to do is preview the video to trammels if everything is in place and then download the video.
To preview the video, click on the play sawed-off on top.
Happy with the video? Then, what are you waiting for? Go superiority and download it!
Click on Publish -> Download Video -> Download to download the video.
Apart from this, you can export your video to variegated social media platforms directly.
Good for you! You have quickly learned how to create storyboard videos by editing a template or from scratch.
The scenarios mentioned in this vendible are just a sample. You can create storyboard videos under various categories like Video Ads, Social Media, Invites, etc., using Animaker’s uber-cool Cartoon Maker.
So what are you waiting for? Go superiority and create a storyboard video now!
Do you moreover want to know how to create a video with pictures and music? Then, trammels out our blog by clicking on the link.
Got any questions? Add them to the comments sections below. We will be happy to help!
The post How to make Storyboard videos? [With Talking Characters] appeared first on Video Making and Marketing Blog.